Getting started with Glewlwyd 2.0

- Installation
- First connection to the administration page
- Configure backends, schemes, scopes and plugins
- How-Tos
- Use case: Configure Glewlwyd to authenticate with Taliesin
- Use case: Configure a registration process with a confirmed e-mail address and OTP, WebAuthn or OAuth2 Client schemes
- Use case: Connect Webmail RainLoop with OpenID Connect plugin using Dovecot configured with a master password
- User profile delegation
- Add or update additional properties for users and clients
- Non-password authentication
- Multiple password authentication
- Test a client configuration with Idwcc
- Troubleshooting
The installation comes with a default configuration that can be updated or overwritten via the administration page or the configuration file.
The default configuration uses Glewlwyd’s database as backend for users and clients. The scopes g_admin and g_profile (for admin page and profile page) are configured for a session duration of 10 minutes.
The following plugins are available but must be instantiated and configured either:
- Glewlwyd OAuth2 plugin
- Glewlwyd OpenID Connect Core plugin
- Register new user/Update e-mail/Reset credentials plugin
Installation
Install Glewlwyd via the packages, CMake or Makefile. See the installation documentation for more details.
First connection to the administration page
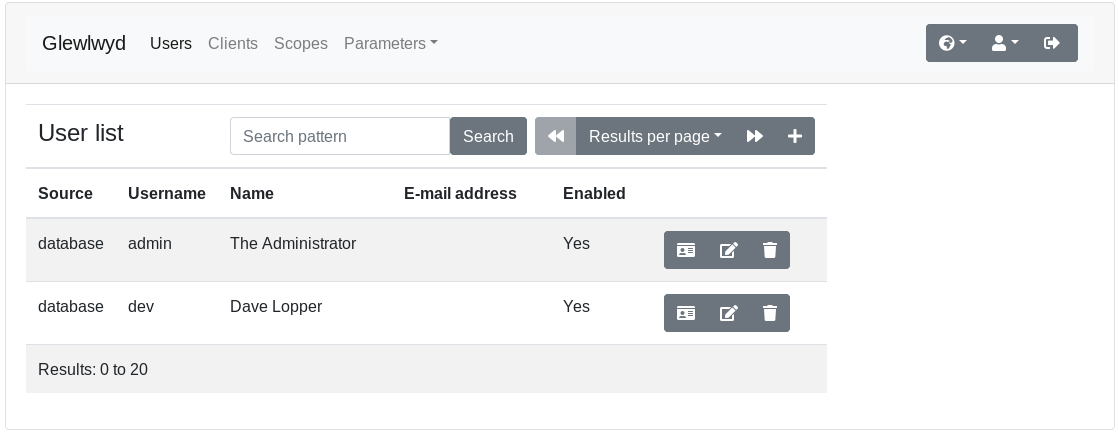
Open the administration page in your browser. The default URL is http://localhost:4593/. Use the default login admin with the default password password.
Make sure to change the default password for the admin user to a more secure password.
Configure backends, schemes and plugins
User backend modules

Go to parameters/user menu in the navigation tab. Click on the + button to add a new user backend instance. The user backend modules available are:
- Database
- LDAP
- HTTP authentication
You can add the same instance of the same user backend module as many times as you want. A user backend module is identified by its module name and its instance name, example database/localDB, ldap/companyAD. The instance name must be unique though, i.e. you can’t have database/local and ldap/local as user backend instances.
Database backend
The database backend requires an access to a database. You can use the same backend as the Glewlwyd server or use a different database. If you use a different database, it must be initialized with the script available in src/user/database.[sqlite3|mariadb|postgresql].sql.
Read the full documentation.
LDAP backend
The LDAP backend requires access to a LDAP service such as OpenLDAP or Active Directory.
Read the full documentation.
HTTP authentication
With this user backend module, every time a user/password access is required, Glewlwyd will use the login/password provided to authenticate on the HTTP service configured and return the result: user valid, user invalid or server error. You must set at least one scope that will be available for all users connecting via this backend.
This module is read-only, and no user data will be stored in Glewlwyd’s storage system, except the user sessions. Which means getting the user list of an HTTP backend will always return an empty list and getting the details of any username will return a build-up JSON object with the following data:
// Response example for the username `user1`:
{
  "username": "user1",
  "scope": ["g_profile","scope1"],
  "enabled": true
}
Read the full documentation.
Client backend module
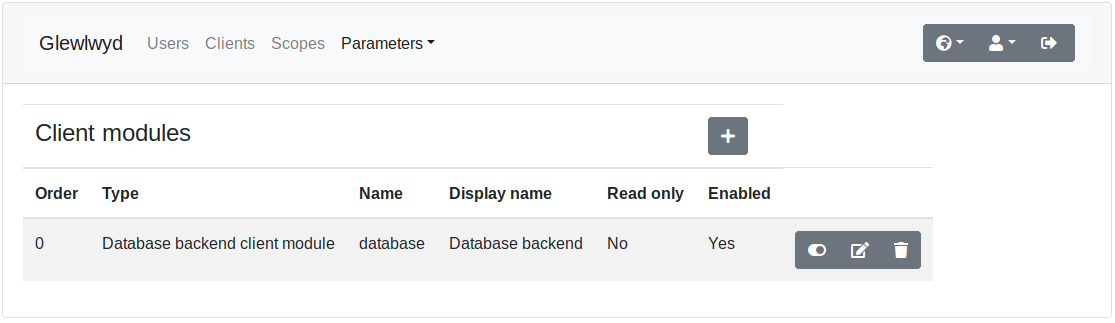
Go to parameters/client menu in the navigation tab. Click on the + button to add a new client backend instance. The client backend modules available are:
- Database
- LDAP
You can add the same instance of the same client backend module as many times as you want. A client backend module is distinguished by its module name and its instance name, example database/localDB, ldap/companyAD.
Database backend
The database backend requires an access to a database. You can use the same backend as the Glewlwyd server or use a different database. If you use a different database, it must be initialized with the script available in src/client/database.[sqlite3|mariadb|postgresql].sql.
Read the full documentation.
LDAP backend
The LDAP backend requires access to a LDAP service such as OpenLDAP or Active Directory.
Read the full documentation.
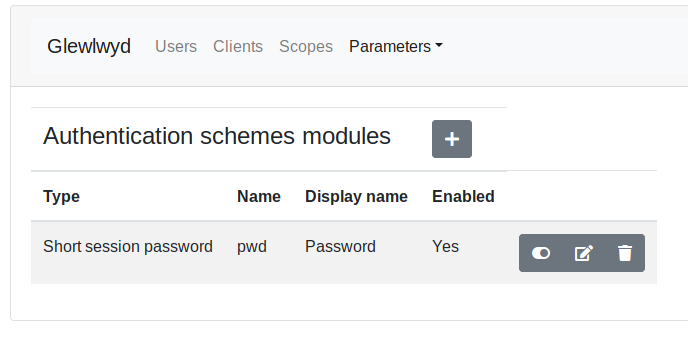
Authentication schemes
When an authentication scheme needs to store specific data for a user, it will use the database rather than the user backend. So a user will be able to register a scheme even if the user backend is in read-only mode.
Please note that a user won’t be able to register nor authenticate with a scheme if the scheme isn’t required to authenticate one of the user’s scope.
Go to parameters/schemes menu in the navigation tab. Click on the + button to add a new scheme instance. The scheme modules available are:
- E-mail code scheme
- WebAuthn scheme
- HOTP/TOTP scheme
- TLS Certificate scheme
- Retype-password scheme
- HTTP Basic Authentication scheme
- OAuth2/OIDC Client Authentication scheme
You can add instances of the same scheme as many times as you want, if you need different configurations or to access different scopes in different contexts. A scheme instance is distinguished by its module name and its instance name, example webauthn/AdminWebauthn, webauthn/UserWebauthn.
Users will need to register some schemes such as HOTP/TOTP or WebAuthn. If the option Allow users to register is unchecked for a scheme, the users won’t be able to register it, only administrators via delegation will be able to register for users.
E-mail code scheme
The requirements to use this scheme is a smtp server available, able to relay codes sent via SMTP.
Read the full documentation.
WebAuthn scheme
The WebAuthn Schema implements authentication based on the WebAuthn API. This allows users to authenticate to Glewlwyd using physical devices: Android or Apple phones, Yubikeys, etc.
Read the full documentation.
HOTP/TOTP scheme
The OTP Schema implements authentication based on One-Time-Password using OATH standard defined in HOTP and TOTP.
Read the full documentation.
TLS Certificate scheme
The TLS Certificates scheme requires SSL/TLS with CA certificate enabled or a reverse proxy configured to authenticate certificates and transfer the certificate data to Glewlwyd’s API.
Read the full documentation.
Retype-password scheme
The Retype-password schema allows to mandatory retype the user password to authenticate, even if the session is authenticated with a valid password. This scheme may be useful to force user to retype its password in some critical process.
HTTP Basic Authentication scheme
The HTTP Basic Authentication performs a login/password authentication against a specified webservice that requires HTTP Basic Authentication. This scheme is similar to HTTP authentication backend but requires users to be already added to any backend (Database or LDAP). The advantage is that you can specify different scopes for each users and add any other additional data for the users.
Read the full documentation.
OAuth2/OIDC Client Authentication scheme
The OAuth2/OIDC Client Authentication scheme allows users to login to Glewlwyd via a trusted external OAuth2 or OpenID Connect provider where they have a valid account. The administrator must enter the trusted providers settings to allow users to use those providers. Mainstream providers such as Google, Microsoft, Facebook, GitHub, etc. are compatible with this scheme.
Read the full documentation.
Scopes
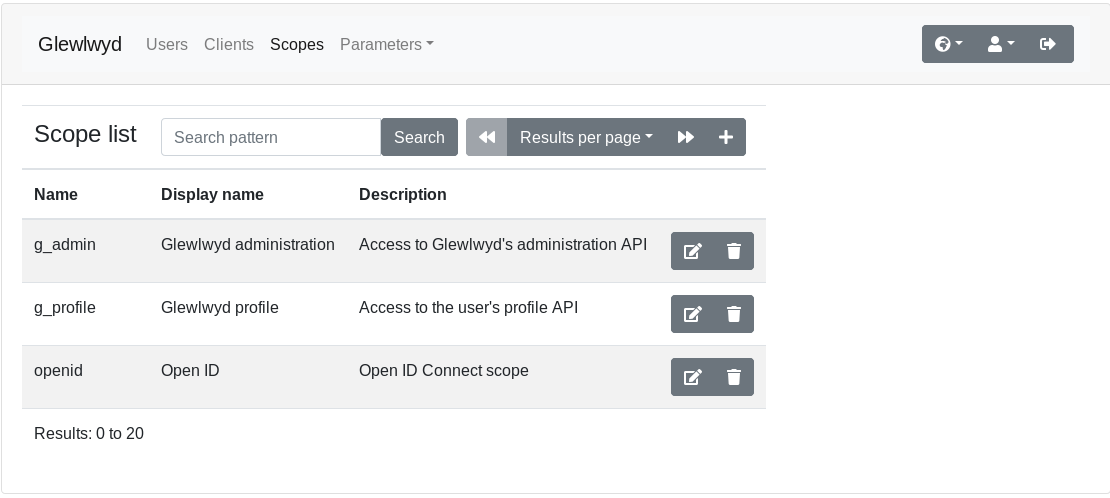
Go to parameters/Scopes menu in the navigation tab. Click on the + button to add a new scope.
Read the full documentation for the scope management.
Plugins
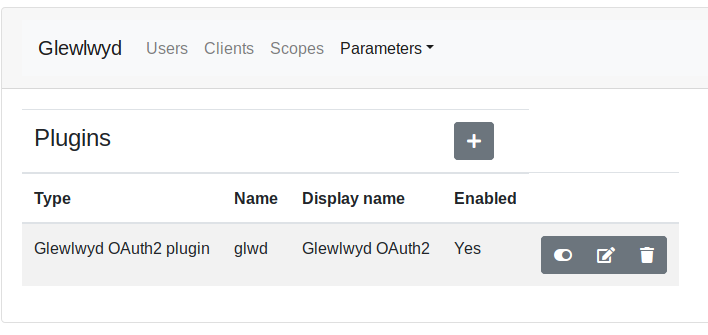
Go to parameters/plugins menu in the navigation tab. Click on the + button to add a new plugin instance. The plugins available are:
- Glewlwyd OAuth2 plugin
- OpenID Connect Core
Glewlwyd OAuth2 plugin
This module has the same behaviour as the legacy Glewlwyd 1.x OAuth2. The new features available are:
- Allow to use a refresh token as a
"rolling refresh", so every time an access token is refreshed, the lifetime of the refresh token will be reset to the original duration. Then if a token is refreshed periodically, users won’t have to reconnect and request a new refresh token every 2 weeks or so. - Allow to overwrite default
rolling refreshsetting and refresh token duration for every scope individually.rolling refreshdisabled and the lowest refresh token duration have precedence in case of conflicting scopes settings. - Allow to add multiple user properties in the
access_tokenrather than one.
Read the full documentation.
When the plugin instance is enabled, its endpoints available are:
/api/<instance_name>/auth/api/<instance_name>/token/api/<instance_name>/profile
OpenID Connect Core Plugin
This plugin implements the OpenID Connect Core standard.
Read the full documentation.
When the plugin instance is enabled, its endpoints available are:
/api/<instance_name>/auth/api/<instance_name>/token/api/<instance_name>/userinfo
Register new user plugin
This plugin allows new users to register to the Glewlwyd service and create a new account. New users may need to confirm their e-mail, set a password to register and/or authentication schemes such as OTP, WebAuthn or TLS Certificate, depending on the configuration.
Read the full documentation.
Configure environment to use Glewlwyd OAuth2
You need a resource service that requires glewlwyd access tokens to work. Some applications are available in my GitHub repositories, like Taliesin, an audio streaming server, Hutch, a password and secret locker, or Angharad, a house automation server.
You need to add a client, at least one scope, and setup the scope(s) for a user.
Create the client
Click on the + button on the client list page in Glewlwyd admin app. You must at least set a client_id, a redirect URI and the authorization types required.
Configure scopes
Go to Scopes menu in the navigation tab. Click on the + button to add a new Scope.
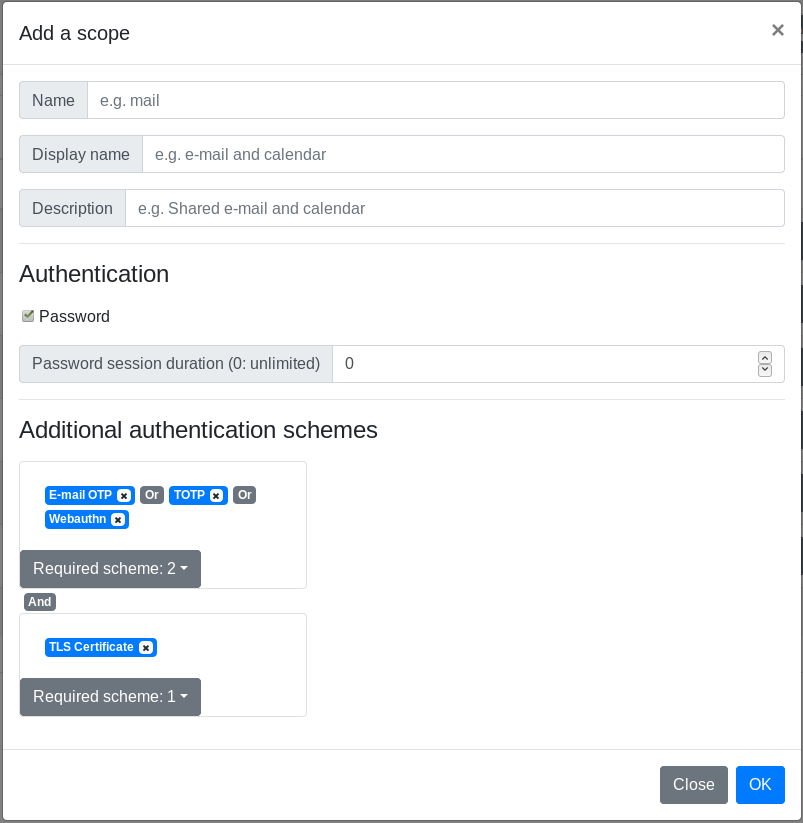
By default, a scope requires only the password for authentication. You can specify additional authentication schemes and/or unset password authentication. You can gather authentication schemes in groups to allow multiple authentication factor, and you can have multiple groups to force more than one additional authentication factor.
The authentication group model can be represented as the following schema:
Scope 1: password AND (mail OR WebAuthn) AND (TOTP OR certificate)
Scope 2: (mail OR certificate OR WebAuthn)
Setup the required scopes for a user
Go to Users menu in the navigation tab, Click on the Edit button for an existing user or click on the + button to add a new user. Then, set the previously created scope to this user.
When the user will connect to the client with Glewlwyd, he will need to validate the authentication schemes for the scopes required with this client.
Access to administration API via API keys
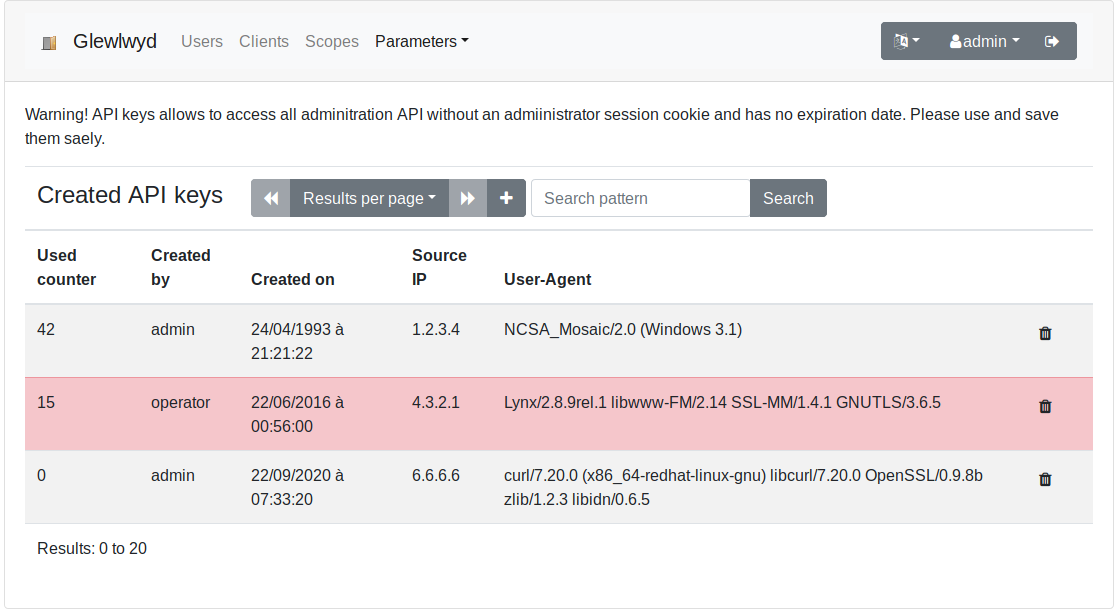
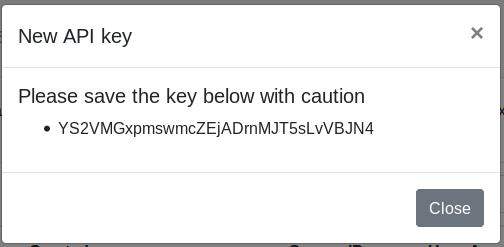
Glewlwyd allows to access all administration API endpoints using an API key to authenticate instead of the admin session cookie. This can be useful if you want to run API commands through scripts for example.
An API key allows to access all admin APIs described in the API documentation, except the APIs to manage API keys for security reasons.
An API key has no expiration date. Therefore be very careful with those, don’t loose them, save them carefully with their creation datestamp, so they won’t leak somewhere and allow bad people to do bad things. You can disable an API key in the admin page.
Use an API key in a script
The API key must be added in the request header Authorization with the prefix token .
Example: getting the list of users using an API key in a curl command:
$ curl 'http://localhost:4593/api/user' -H 'Authorization: token XJcv1MRnK33EHAedPGELl0yXx2W6vUPu'
Prometheus metrics
If the Prometheus endpoint is enabled, then you can access the prometheus metrics via the default url http://localhost:4594/. By default, Glewlwyd logs the following metrics:
General
- Total number of successful authentication
- Total number of successful authentication by scheme
- Total number of invalid authentication
- Total number of invalid authentication by scheme
- Total number of database errors

OAuth2 plugin
- Total number of code provided
- Total number of device code provided
- Total number of refresh tokens provided
- Total number of access tokens provided
- Total number of client tokens provided
- Total number of unauthorized client attempt
- Total number of invalid code
- Total number of invalid device code
- Total number of invalid refresh token
- Total number of invalid access token

OIDC plugin
- Total number of code provided
- Total number of device code provided
- Total number of id_token provided
- Total number of refresh tokens provided
- Total number of access tokens provided
- Total number of client tokens provided
- Total number of unauthorized client attempt
- Total number of invalid code
- Total number of invalid device code
- Total number of invalid refresh token
- Total number of invalid access token

Registration plugin
- Total number of registration started
- Total number of registration completed
- Total number of registration cancelled
- Total number of e-mails updated
- Total number of reset credentials started
- Total number of reset credentials completed
How-Tos
Use case: Configure Glewlwyd to authenticate with Taliesin
This use case is based on the following assertions:
- Glewlwyd is freshly installed with default configuration
- Glewlwyd is installed on the local machine and available at the address http://localhost:4593/
- Taliesin is installed on the local machine and available at the address http://localhost:8576/
- The scope
taliesinwill be configured as a rolling refresh, with password only - The scope
taliesin_adminwill be configured as standard refresh token, without rolling refresh enabled, with password and OTP 2nd factor or WebAuthn enabled - The tokens are jwt signed with a RSA 256 key, the key file and the certificate must be available.
To create a RSA key/certificate pair, run the following commands on a Linux shell with openssl installed:
$ # private key
$ openssl genrsa -out private-rsa.key 4096
$ # public key
$ openssl rsa -in private-rsa.key -outform PEM -pubout -out public-rsa.pem
Open the Glewlwyd admin page http://localhost:4593/ in your browser, connect as administrator (admin/password)
Step 1: Change admin password
Click on the Change password menu on the navigation tab, there, you should change the admin password with a more efficient password.
Step 2: Add OTP and WebAuthn schemes
Go to parameters/schemes menu in the navigation tab. Click on the + button to add a new scheme instance.
In the new scheme modal, enter in the name field otp, in the display name field OTP, select HOTP/TOTP in the type drop-down. Leave the other default parameters as is and click save. The scheme OTP should appear in the scheme list.
Then click again on the + button to add the WebAuthn scheme. In the new scheme modal, enter in the field name webauthn, in the display name field WebAuthn, select WebAuthn in the type drop-down. Leave the other default parameters as is and click save. The scheme OTP should appear in the scheme list.
Step 3: Add scopes in Glewlwyd
- Add the scope
taliesin, check the password checkbox - Add the scope
taliesin_admin, check the password checkbox and add the schemesOTPandWebAuthnto the scope
Step 4: Add a Glewlwyd OAuth2 plugin instance
Go to parameters/plugins menu in the navigation tab. Click on the + button to add a new plugin instance.
In the new plugin modal, enter in the name field glwd, in the display name field Glewlwyd OAuth2, select Glewlwyd OAuth2 in the type drop-down. There, select RSA as JWT type, 256 as key size, set your private and public key. Deploy Specific scope parameters and add the scope taliesin_admin, disable rolling refresh for this scope.
Click Ok.
Step 5: Add the client Taliesin
Go to Clients menu in the navigation tab. Click on the + button to add a new client.
In the new client modal, enter taliesin in the client ID field, Taliesin in the name field. Add the redirect URI http://localhost:8576/, add the following authorization types: code, token and refresh_token.
Step 6: Add a simple user and setup admin user
Go to Users menu in the navigation tab. Click on the + button to add a new user.
In the new user modal, enter t_user in the username field, Taliesin User in the name field, set a password (8 characters minimum), add the scopes g_profile and taliesin. Click Ok. The new user t_user should appear in the users list.
Step 7: Configure OTP and WebAuthn for admin
Click on the delegate profile button for the user admin. In the new page, select otp in the navigation bar.
Create a new OTP scheme for the user admin, select TOTP in the drop-down list, click on the Generate button to generate a random secret for this scheme, click Save. Your TOTP scheme is configured. Then you can reproduce this configuration on another device, like an OTP application on a smartphone. You can use the generated QR Code in the profile page.
Register a new WebAuthn device. Select WebAuthn in the navigation bar.
Two types of WebAuthn devices are currently supported: fido-u2f types like Yubikeys and android-safetynet types like Android phones or tablet, version 7 or above. Click on the button Register to add a new registration. Follow the steps on your browser to complete the registration. You can test the authentication by clicking on the Test button.
Step 8: Configure Taliesin’s config.json file
Open the file webapp/config.json on an editor. The file should look like this now:
{
	"taliesinApiUrl": "http://localhost:8576/api",
	"storageType": "local",
	"useWebsocket": true,
	"oauth2Config": {
		"enabled": true,
		"storageType": "local",
		"responseType": "code",
		"serverUrl": "http://localhost:4593/api/glwd",
		"authUrl": "auth",
		"tokenUrl": "token",
		"clientId": "taliesin",
		"redirectUri": "http://localhost:8576/",
		"scope": "taliesin taliesin_admin",
		"profileUrl": "profile"
	}
}
Step 9: Open Taliesin in your browser
Open the URL http://localhost:8576/ in your browser.
Click on the login button, you should be redirected to Glewlwyd’s login page.
There, log in with your admin password. After that, use the second factor authentication of your choice. When completed, click on the Continue button which should be enabled. You will be redirected to Taliesin with a valid login and able to use the application as administrator, enjoy!
Use case: Configure a registration process with a confirmed e-mail address and OTP, WebAuthn or OAuth2 Client schemes
Let’s say you want to organize a conference with an open registration, you don’t want your users to remember a password but you want a secure login. New users will use their e-mail address as username, will have to register a new OTP before completing registration, then will be allowed to register their Facebook or Google account to login to your application, and also will be allowed to register a WebAuthn device such as Yubikey or an android phone with fingerprint scan.
This use case will describe configuration steps to have a Glewlwyd instance where new users will have to register an account using a verified e-mail address, at least the OTP scheme and optionally a WebAuthn or an external OAuth2 register (Google or Facebook in this example).
This use case is based on the following assertions:
- Glewlwyd is freshly installed with default configuration
- Glewlwyd is installed on a machine and available at an external address, for the rest of this documentation, the following example address will be used: https://glewlwyd.tld/.
Step 1: Register your Glewlwyd instance as an OAuth2 client at Facebook and Google
Follow the procedure for each provider to create an OAuth2 client:
- Facebook: https://developers.facebook.com/docs/facebook-login/manually-build-a-login-flow/
- Google: https://developers.google.com/identity/protocols/OAuth2
For each provider, you must use the callback address https://glewlwyd.tld/callback.tld in your registration (replace https://glewlwyd.tld/ with your glewlwyd instance external address).
Step 2: Add authentication schemes
You must instantiate the schemes OTP, WebAuthn and OAuth2 by using their respective documentation.
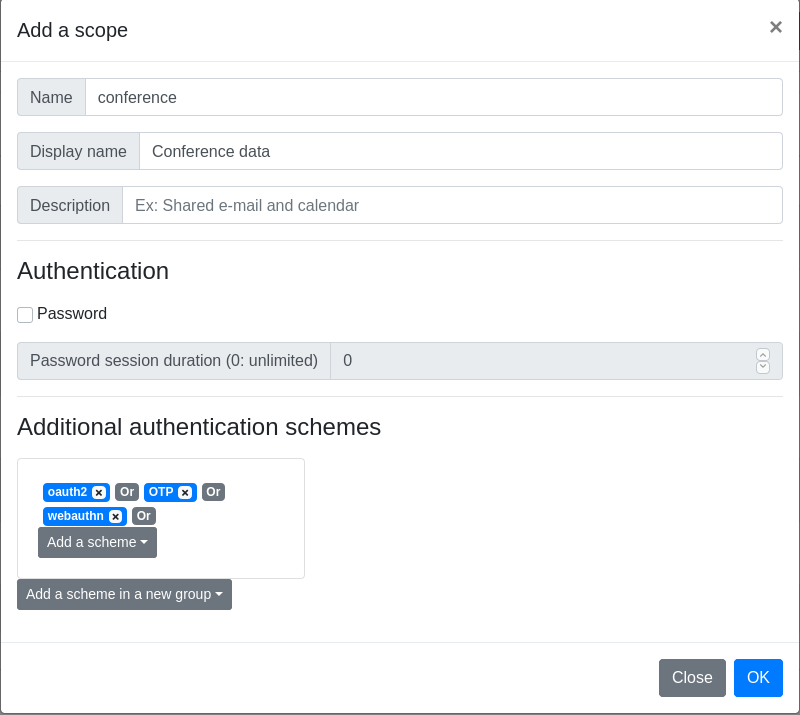
Step 3: Add a new scope
Add the new scope conference, disable Password in the Authentication paragraph, then add the 3 schemes to the scope Additional authentication scheme in the same group, see screenshot below.
Step 4: Add a register plugin
Add a new register plugin, name register:
Passwordset toNoscopes to addset toconferenceonly- Add the schemes
OTP,oauth2andWebAuthn, for the scopeOTP, setmandatorytoYes - Check
verify e-mailandusername is e-mail - Enter your SMTP server configuration, at least
SMTP serverandE-mail sender address - In
E-mail body, replace<your_registration_plugin_name>withregister
Step 5: Update webapp/config.json
In the last step, you will have to update your webapp/config.json file to adapt your front-end to your configuration.
"defaultScheme": "otp", // This will be the default authentication scheme
"sessionSchemes": [
  {
    "scheme_name": "webauthn",
    "scheme_display_name": "login.webauthn-title",
    "scheme_type": "webauthn"
  },
  {
    "scheme_name": "otp",
    "scheme_display_name": "login.otp-title",
    "scheme_type": "otp"
  },
  {
    "scheme_name": "oauth2",
    "scheme_display_name": "login.oauth2-title",
    "scheme_type": "oauth2"
  }
],
"register": [
  {
    "name": "registration",
    "message": "login.register-link"
  }
],
"register-complete": [
  {
    "name": "registration",
    "complete-link": "https://www.example.com/", // Replace with the url of your application
    "complete-link-label": "profile.register-complete-link"
  }
],
Use case: Connect Webmail RainLoop with OpenID Connect plugin using Dovecot configured with a master password
Deprecated - Rainloop seems unmaintained and has unfixed bugs (june 2022) - I keep this documentation for curious people, but rainloop shouldn’t be recommended.
To connect to a RainLoop Webmail instance with Glewlwyd’s OpenID Connect plugin, here is a validated setup.
- Add additional claim
emailin the ID Token
See OIDC Configuration.
- Configure Dovecot to allow connectig via master password
Sample dovecot config to add a master password file:
auth_master_user_separator = *
passdb {
  driver = passwd-file
  args = /etc/dovecot/passwd.masterusers
  master = yes
  result_success = continue
}
Use htpassword to create the file passwd.masterusers:
$ htpasswd -b -c -s passwd.masterusers masteruser password
Security tip: restrict use of the master password to the ip address hosting Roundcube, append ::::::allow_nets=127.0.0.1/32 to your masterusers password record, the content of the file passwd.masterusers should look like this:
masteruser:{SHA}xxxyyyzzz=::::::allow_nets=127.0.0.1/32
- Configure mod_auth_openidc to authenticate via Glewlwyd before accessing the webmail
Sample apache.conf config:
Alias /webmail /path/to/rainloop

OIDCProviderMetadataURL https://glewlwyd.tld/api/oidc/.well-known/openid-configuration
OIDCClientID webmail_client
OIDCClientSecret webmail_client_secret
OIDCResponseType "code"
OIDCScope "openid mail"
OIDCOAuthRemoteUserClaim "userid"

OIDCRedirectURI /webmail/callback
OIDCCryptoPassphrase xyz123
OIDCSessionInactivityTimeout 3600

<Location /webmail/>
  AuthType openid-connect
  Require valid-user
</Location>
<Location /webmail/data>
  Require all denied
</Location>
- Add a new rainloop plugin dedicated to map OIDC connection with Rainloop
Create a directory oidc-master-password-login/ in the location <rainloop_root>/data/_data_/_default_/plugins, download the files from this gist in this new directory.
- Enable and configure the rainloop plugin
oidc-master-password-login/
Go to RainLopp admin page, on the plugin tab, enable oidc-master-password-login, then configure on the plugin to map your configuration:
- Header username:
OIDC_CLAIM_userid - Master Username and separator:
*masteruser(don’t forget the separator) - Master Password: your dovecot master password
Now, when you open RainLoop url, you should be redirected to Glewlwyd login page first, then if successfull, you will be redirected to the RainLoop login page with the e-mail field filled with your e-mail address and a fony password, click on the login button, you are now successfully logged in RainLoop!
User profile delegation
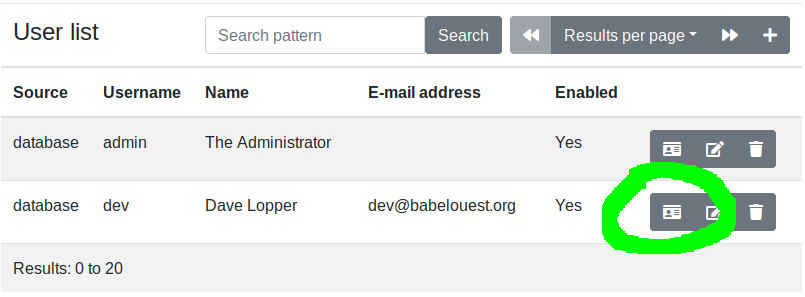
An connected administrator can update a user profile with the delegation functionality. A new window will open, allowing the administrator to update the user profile, register or de-register authentication schemes for the user.

Add or update additional properties for users and clients
Glewlwyd is designed to allow administrators to add or update additional properties for users and clients. The following paragraphs will explain how to add a new property for a user. The same process for the client is similar. All additional properties are strings, no other data format is possible.
Step 1: Add a specific data format
Edit the user module parameters. In the User Backend settings modal, deploy Specific data format and click on the + button. Enter the property name, ex postal-code.
The checkbox multiple values defines whether the new property values will be a single value or an array of multiple values.
The checkboxes Read (admin) and Write (admin) define whether this property is readable and/or writable on the user list in the administration page.
The checkboxes Read (profile) and Read (profile) define whether this property is readable and/or writable on the profile page.
Step 2: Update webapp/config.json to show the new property
Open the file webapp/config.json with a text editor. There, you must add a new JSON object in the array pattern.user.
The user pattern format is the following:
{
  "name": "postal-code", // name of the new property, mandatory
  "type": "text", // values available are "text", "password" (hidden text), "boolean" (checkbox) or "textarea", optional, default "text"
  "list": true, // set this to true if the new property has `multiple values` checked, optional, default false
  "listElements": ["value1","value2"] // restrict the values available to this list if the new property has `multiple values` checked, optional
  "profile": false, // visible on the profile page, optional, default false
  "edit": true, // Can be updated, optional, default false
  "label": "admin.user-password", // i18next label name, label files is available in the files `webapp/locales/*/translations.json`, mandatory
  "placeholder": "admin.user-password-ph", // i18next placeholder value for text or password types, label files is available in the files `webapp/locales/*/translations.json`, optional, default empty
  "forceShow": true, // show the property even if the user has no value yet, optional, default false
  "required": true, // is the property mandatory?, optional, default false
  "profile-read": false, // can the user read the property in profile page, optional, default false
  "profile-write": false // can the user write the property in profile page, optional, default false
}
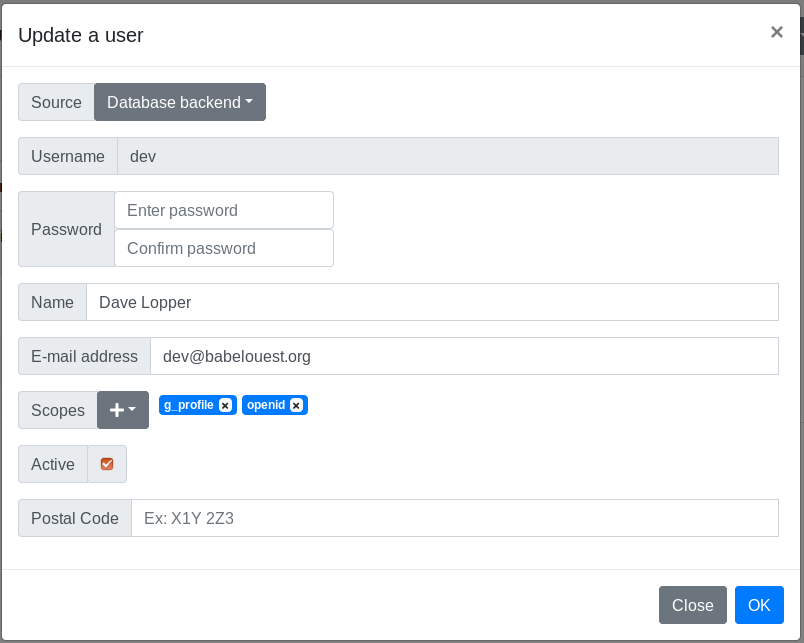
The Postal Code pattern should look like this:
{
  "name": "postal-code",
  "list": false,
  "forceShow": true,
  "edit": true,
  "label": "admin.postal-code",
  "placeholder": "admin.postal-code-ph"
}
And the new entries in webapp/locales/*/translations.json should look like this:
{
  // [...]
  "admin": {
    // [...]
    "postal-code": "Postal Code",
    "postal-code-ph": "Ex: X1Y 2Z3"
  }
}
Then you should see the new property in the user edit modal:
Non-password authentication
Glewlwyd allows non-password authentication. You can use any other scheme installed to authenticate a user. If a required scope has the option Password checked, the password will be mandatory to grant access to this scope.
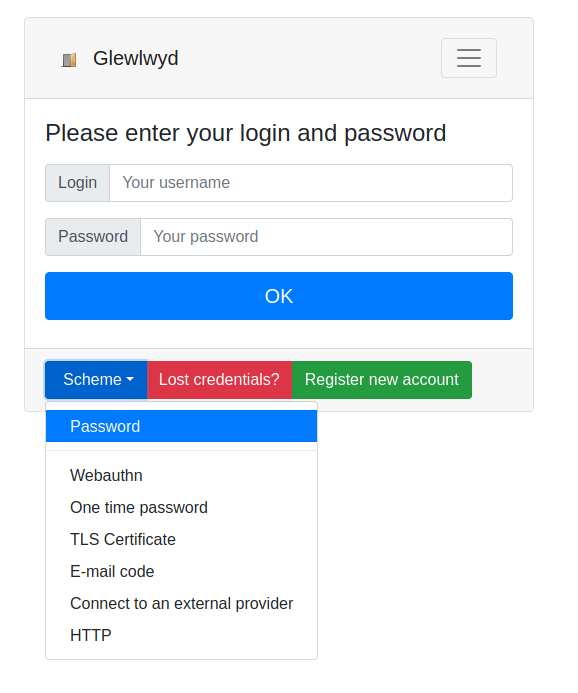
One or more schemes must be already installed: E-mail code, WebAuthn, Client certificate, HOTP/TOTP, etc. The scheme must be defined in the file webapp/config.json in the sessionSchemes array. The pattern is the following:
{
  "scheme_type": "webauthn", // name of the module, mandatory
  "scheme_name": "webauthn", // name of the module instance, mandatory
  "scheme_display_name": "login.webauthn-title" // i18next label name, label files is available in the files `webapp/locales/*/translations.json`, mandatory
  "identify": true // Does this scheme requires username first? Available only for schemes OAuth2 and TLS certificate with scheme storage option
}
Then, in the login page for a new user, the drop-down Scheme will be available, allowing to authenticate with the schemes specified.
The option defaultScheme in the config.json file can be used to overwrite password as default scheme to authenticate users. Fill this option with a scheme name present in the sessionSchemes array. Example:
"defaultScheme": "webauthn",
Multiple password authentication
This feature is new since Glewlwyd 2.5. If this option is enabled in a user backend module (except for the User Module HTTP Backend), users are allowed to have more than one password to authenticate in Glewlwyd services where password is required.
The use-case why this feature was added is when the user backend is LDAP and this LDAP service is used to authenticate to other services than Glewlwyd, such as an IMAP service or network login. All those services can use different passwords, and those different passwords don’t have to be remembered by the user if the user uses a password vault. Also, if one password is compromised, you can change only the compromised password without having to change the password in all the services.
Be careful that every password will allow the same access level to your Glewlwyd service, so all of them must be strong enough to avoid being guessed.
Test a client configuration with Idwcc
The tool idwcc is available via the library iddawc to test a client configuration with Glewlwyd (or any other OAuth2/OIDC provider).
You can build the tool yourself, install it via a pre-compiled package, or use the docker image available.
See the idwcc readme for more details.
Troubleshooting
Impossible to log in as administrator - N-factor issue
If for any reason, the n-factor(s) scheme(s) added to the scope g_admin can’t be used anymore, you can reset the scope g_admin to its original setup, i.e. password only, no n-factor authentication.
- Step 1 (optional but recommended): to use Glewlwyd in a secured channel, you can disconnect Glewlwyd from the outside world, in order to avoid opportunity attacks when the security will be lowered. i.e.: disable the reverse proxy if you have one and access your Glewlwyd instance directly, or add rules to yuor firewall.
- Step 2: Backup your database
- Step 3: connect to your database and execute the following SQL queries:
-- Remove all n-factor authentication to scope
DELETE FROM g_scope_group_auth_scheme_module_instance WHERE gsg_id IN (SELECT gsg_id FROM g_scope_group WHERE gs_id IN (SELECT gs_id FROM g_scope WHERE gs_name='g_admin'));
DELETE FROM g_scope_group WHERE gs_id IN (SELECT gs_id FROM g_scope WHERE gs_name='g_admin');
-- Set scope settings to password required and 10 minutes session
UPDATE g_scope SET gs_password_required=1, gs_password_max_age=600 WHERE gs_name='gs_admin';
Impossible to log in as administrator - Password lost
If you lost your administrator password, assuming you use the database backend, you can reset it with one of the following SQL queries, depending on your database type:
-- MariaDB/MySQL
UPDATE g_user SET gu_password=PASSWORD('password'), gu_enabled=1 WHERE gu_username='admin';

-- SQlite3
UPDATE g_user SET gu_password='fOfvZC/wR2cUSTWbW6YZueGyyDuFqwkoFlcNlRYWJscxYTVOVFJ3VWFHdVJQT0pU', gu_enabled=1 WHERE gu_username='admin';

-- PostgreSQL
UPDATE g_user SET gu_password=crypt('password', gen_salt('bf')), gu_enabled=1 WHERE gu_username='admin';